🧭 Squidで「http_port 8080」と「https_port 8082」を使い分ける
この記事では、
http_portとhttps_portの違い、クライアント側の設定方法、運用パターン、トラブル時の確認ポイントを解説します。
目次
- 1.
http_port 8080の動作 - 2.
https_port 8082の動作(SSL Bump/透過) - 3.
http_portとhttps_portの比較表 - 4. 実運用のおすすめ構成
- 5. クライアント設定の具体例
- 6. よくあるハマりどころ(チェックリスト)
- 7. サンプル設定(そのまま流用可)
- 8. まとめ
- 付録:動作確認コマンド
1. http_port 8080 の動作
役割:標準的な HTTPプロキシ。ブラウザ/OSで明示プロキシを設定して利用します。
HTTPSの扱い:CONNECT メソッドでトンネルを張り、中身は見えません。
通信フロー(概念)
Client --HTTP--> Squid(http_port) --HTTP/HTTPS--> Web
                └─ HTTPSはCONNECTでトンネル
リクエスト例(ブラウザ→Squid)
GET http://www.example.com/ HTTP/1.1
Host: www.example.com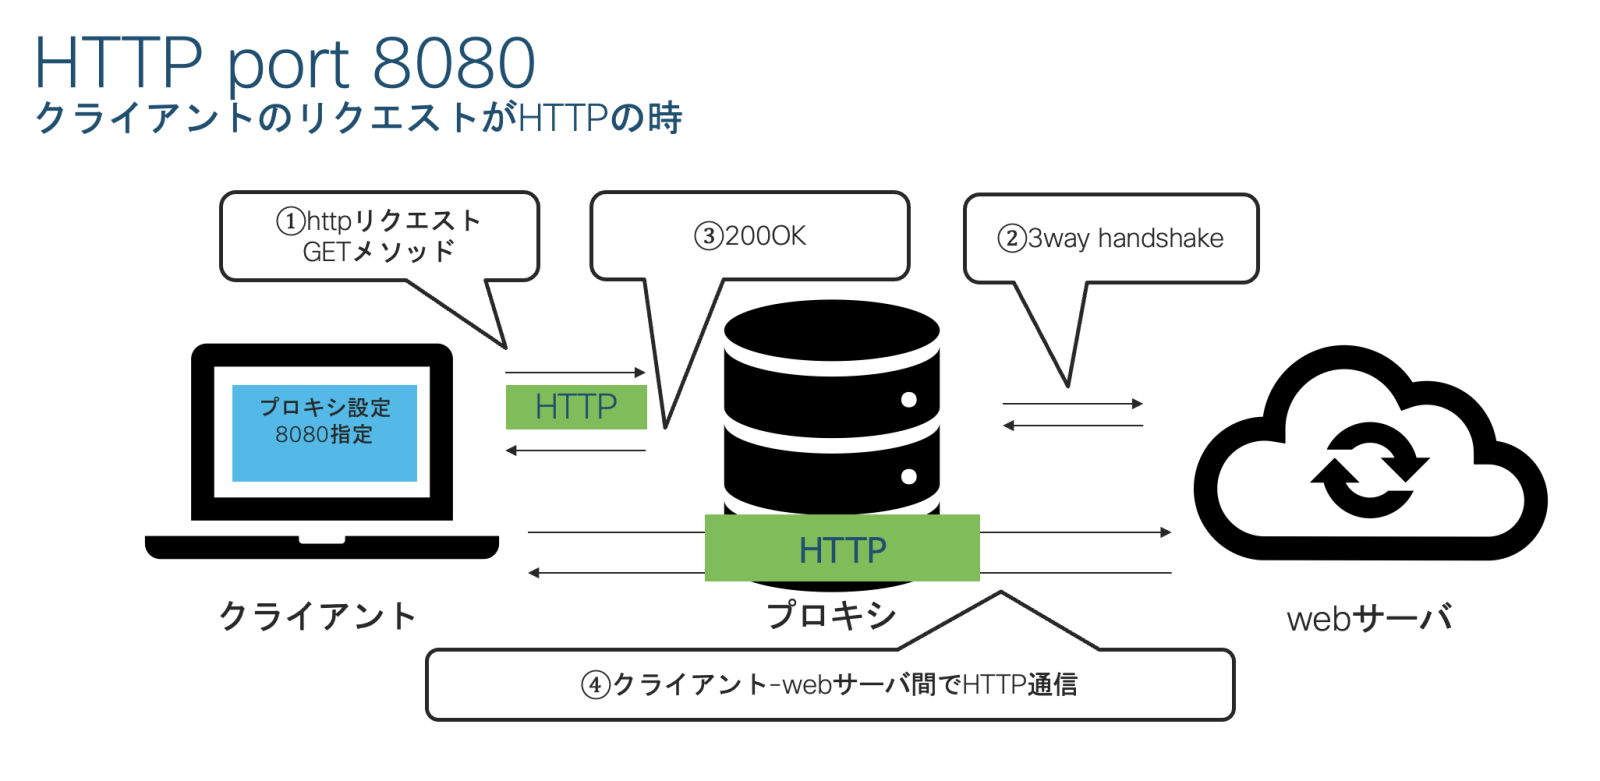
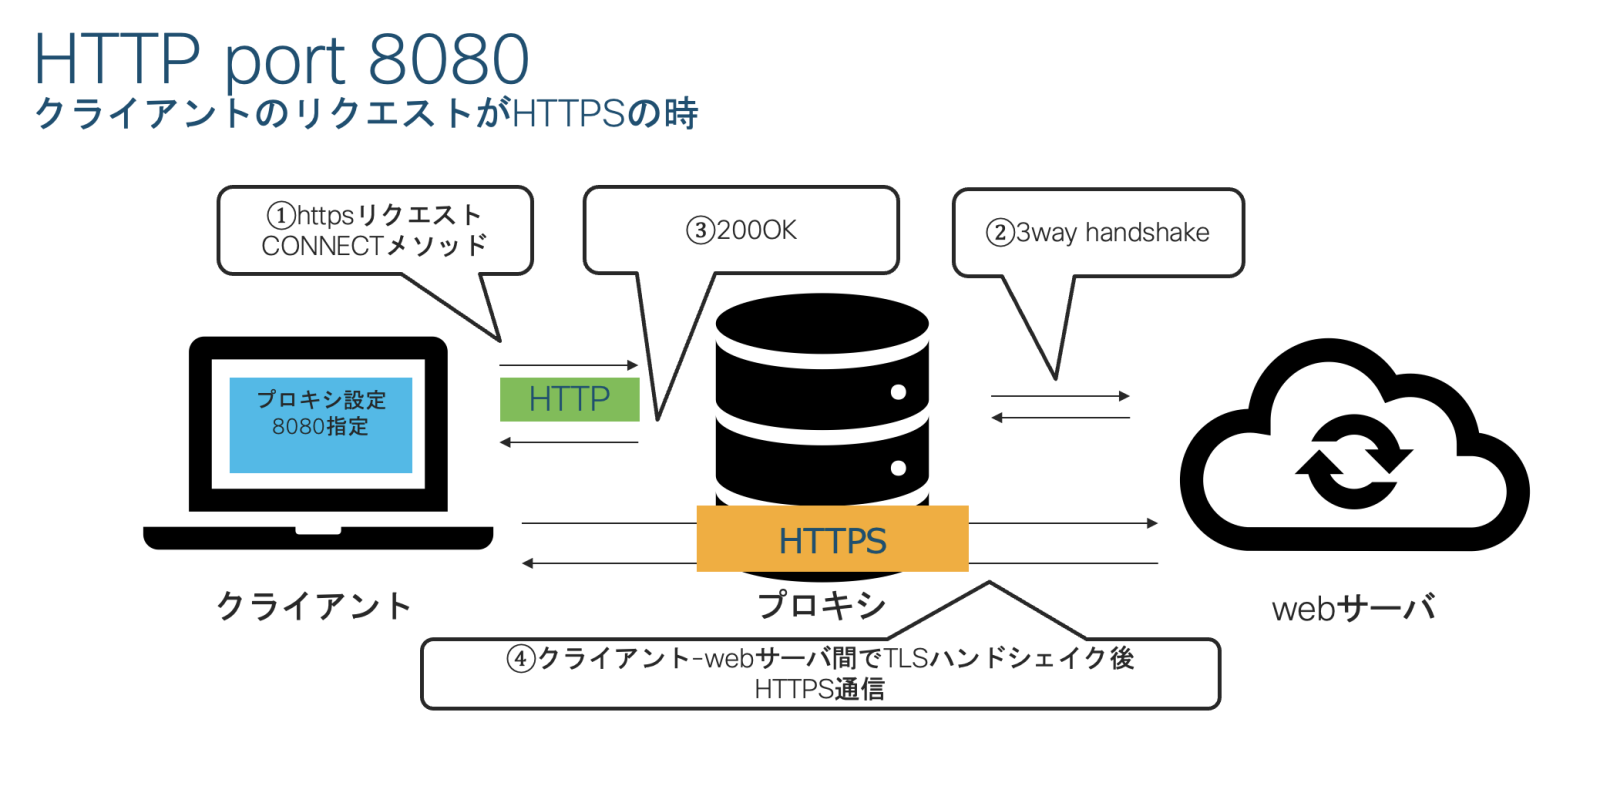
ポイント
- クライアント〜Squid間は 平文(HTTP)。
- 証明書配布は不要(中身を見ないため)。
2. https_port 8082 の動作(SSL Bump/透過)
役割:TLS(HTTPS)をSquidで終端するためのポート。
主な用途:SSL Bump(復号検査)、透過HTTPSプロキシ。
通信フロー(概念)
Client --TLS(HTTPS)--> Squid(https_port) --TLS/HTTP--> Web
                         └─ 必要に応じて復号(ssl_bump)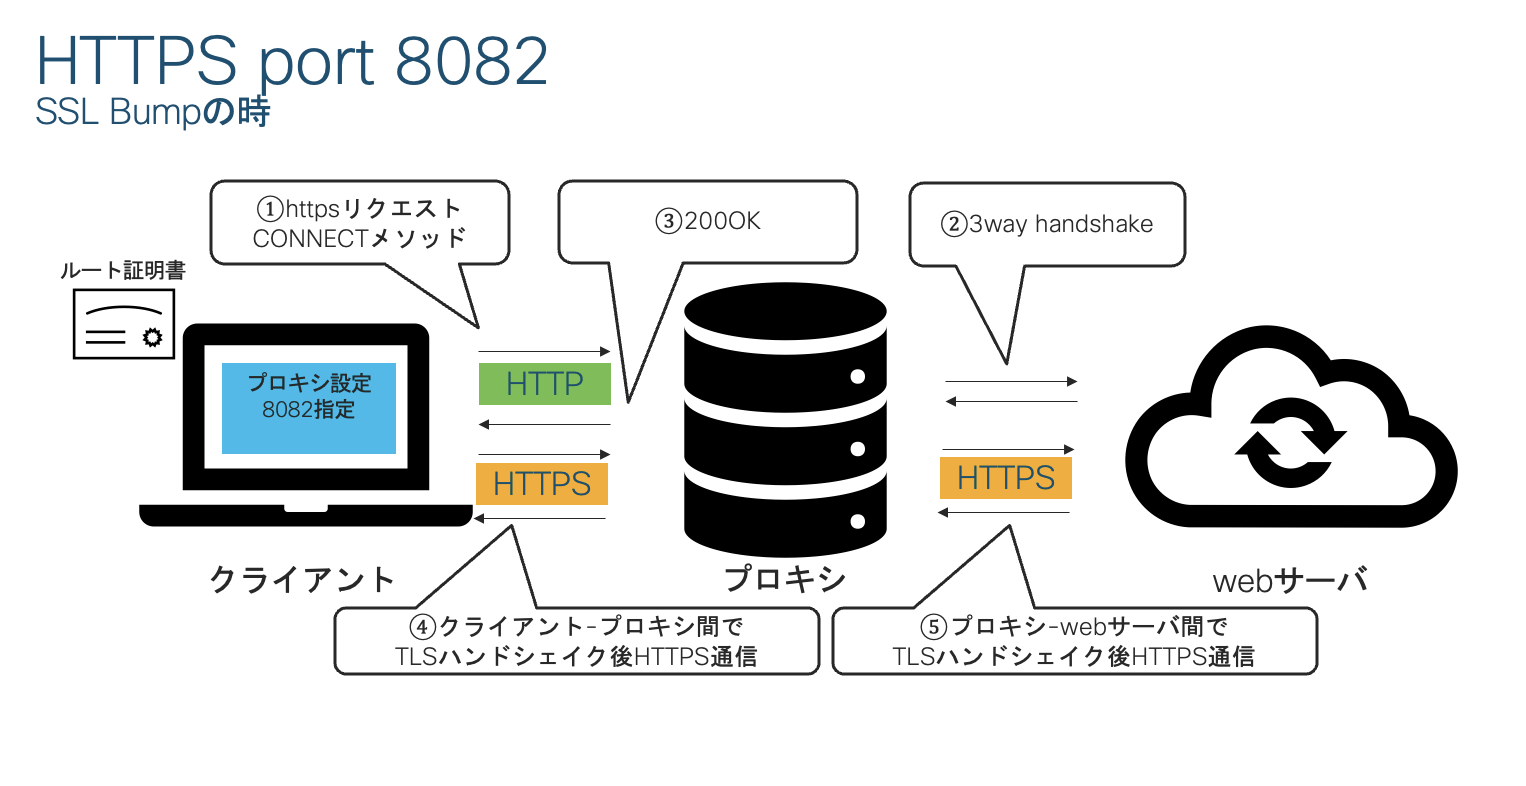
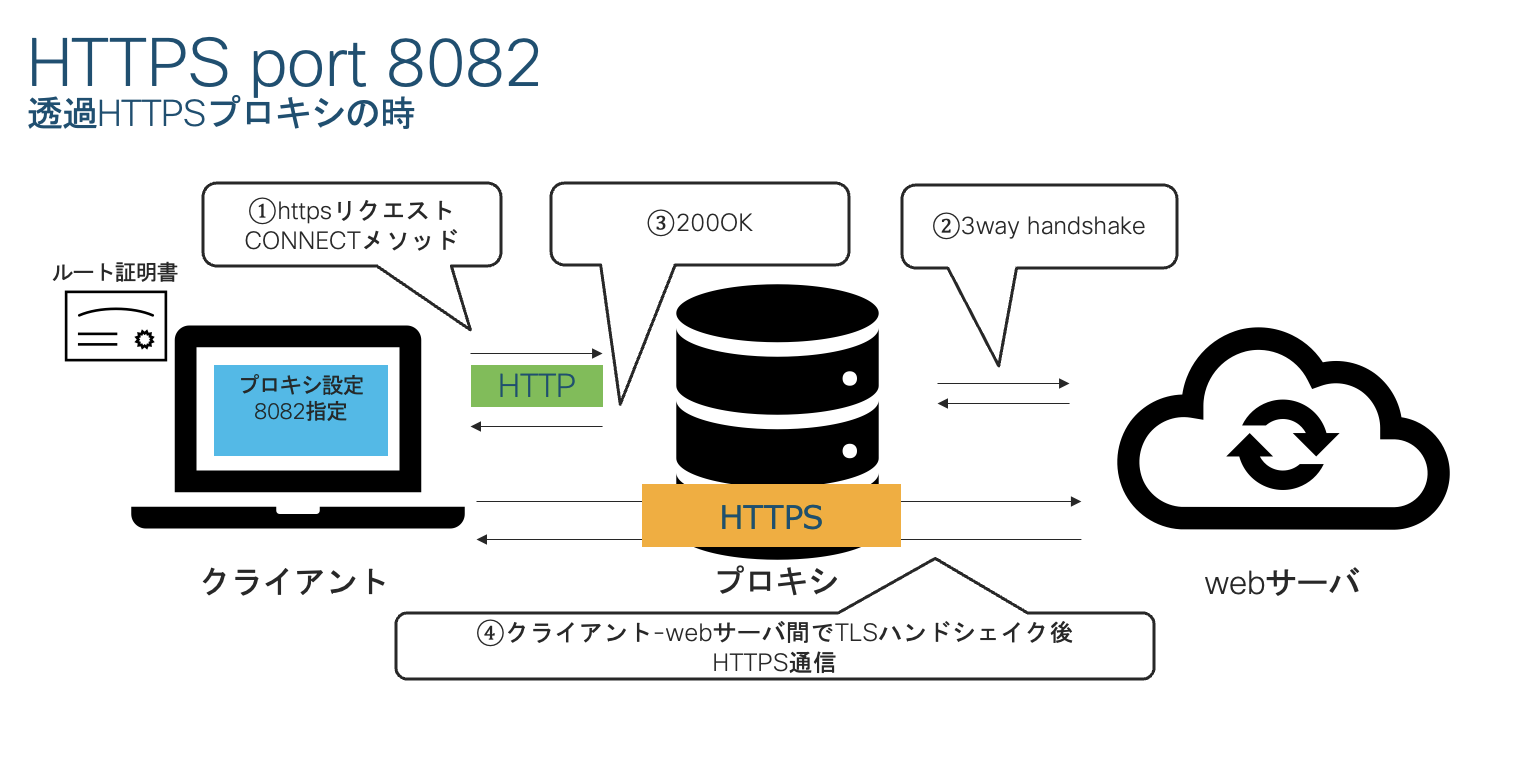
ポイント
- クライアント〜Squid間も 暗号化。
- ルートCA証明書をクライアントへ配布・信頼させる必要あり(bumpする場合)。
- 透過運用時は L3/L4 で
443 → 8082にリダイレクト。 - Bumpについては詳しくはこちらから
3. http_port と https_port の比較表
| 比較項目 | http_port 8080 |
https_port 8082 |
|---|---|---|
| 主な用途 | 通常のHTTP/HTTPSプロキシ | SSL Bump / 透過HTTPS |
| クライアント接続 | HTTP | HTTPS (TLS) |
| クライアント設定 | 明示プロキシ | 明示 or 透過(FW/NAT必須) |
| 暗号化(Client→Squid) | なし(平文) | あり(TLS) |
| 証明書配布 | 不要 | 必要(中間CA) |
| HTTPSの中身可視化 | 不可(CONNECTのトンネル) | 可能(bump時) |
4. 実運用のおすすめ構成
A. シンプル(HTTPS検査なし)
- 目的:ログ/キャッシュ/URLフィルタを軽く入れたい
- 設定:
http_port 8080のみ - メリット:証明書配布不要、トラブル少なめ
B. 検査あり(SSL Bump)
- 目的:HTTPSの内容を可視化・制御(マルウェア検査等)
- 設定:
http_port 8080+https_port 8082 ssl-bump ... - 要件:クライアントに ルートCA証明書配布、ポリシー説明
C. 透過(ユーザー設定なしで強制プロキシ)
- 目的:端末側設定なしで統制
- 設定:FW/ルータで
tcp/443 → 8082、tcp/80 → 3128/8080などにNAT - 要件:ネットワーク側のリダイレクト定義 + CA配布(HTTPS透過時)
5. クライアント設定の具体例
明示プロキシ(ブラウザ/OS)
http_portのみ
HTTPプロキシ:192.168.100.205:8080
HTTPSプロキシ:192.168.100.205:8080https_portをHTTPSプロキシに
HTTPSプロキシ:192.168.100.205:8082
(併用するなら HTTP 側は192.168.100.205:8080)
中間CA証明書を信頼ストアに配布(GPO/MDMなど)
透過(Transparent)
- 端末側は プロキシ設定なし。
- ネットワーク機器で 80/443 → Squidのポートへ転送。
6. よくあるハマりどころ(チェックリスト)
7. サンプル設定(そのまま流用可)
7.1 最小構成:明示プロキシ(検査なし)
# /etc/squid/squid.conf
http_port 8080

# 例: 最低限のACL
acl allowed src 192.168.0.0/16
http_access allow allowed
http_access deny all
7.2 併用構成:明示 + SSL Bump
# /etc/squid/squid.conf
http_port 8080

https_port 8082 ssl-bump   cert=/etc/squid/ssl_cert/myCA.pem   key=/etc/squid/ssl_cert/myCA.key   generate-host-certificates=on   dynamic_cert_mem_cache_size=4MB

# Bump ポリシー例
acl step1 at_step SslBump1
ssl_bump peek step1
ssl_bump bump all

# 基本のアクセス制御
acl allowed src 192.168.0.0/16
http_access allow allowed
http_access deny all

# 証明書DB(初回のみ)
# /etc/squid/ssl_cert/ssl_db を作る
# /usr/lib64/squid/security_file_certgen -c -s /etc/squid/ssl_cert/ssl_db -M 4MB
7.3 透過HTTPS(ネットワークで443→8082転送)
# /etc/squid/squid.conf
http_port 3128 intercept
https_port 8082 intercept ssl-bump   cert=/etc/squid/ssl_cert/myCA.pem   key=/etc/squid/ssl_cert/myCA.key   generate-host-certificates=on

acl step1 at_step SslBump1
ssl_bump peek step1
ssl_bump bump all

acl allowed src 192.168.0.0/16
http_access allow allowed
http_access deny all
※ 透過は FW/NATルール が必須。端末のデフォルトゲートウェイ上で実装するのが一般的。
8. まとめ
- 通常利用(検査なし):
http_port 8080だけでOK。証明書配布なしで簡単。 - 検査あり:
https_port 8082でSSL Bump。ルートCA配布が必須。 - 透過:ネットワーク転送(443→8082)が必要。NAT/FWルールとポリシー順序に注意。
迷ったら:まずは http_port 8080 単独 で安定させる → その後、要件に応じて https_port(SSL Bump/透過)を段階的に追加するのがおすすめ。
付録:動作確認コマンド(管理端末で)
# HTTP越しにGoogleのヘッダ取得(明示プロキシ8080)
curl -I -x http://192.168.100.205:8080 http://www.google.com

# HTTPSをCONNECTで通す(明示プロキシ8080)
curl -I -x http://192.168.100.205:8080 https://www.google.com

# 直接HTTPSでSquidへ(https_port 8082 にTLSで接続)
openssl s_client -connect 192.168.100.205:8082 -servername www.google.com